Elastic Analysis Facility (EAF): Difference between revisions
| (50 intermediate revisions by 2 users not shown) | |||
| Line 1: | Line 1: | ||
[[Category:EAF]] [[ category:Introduction]] | [[Category:EAF]] [[ category:Introduction]] | ||
= Note = | |||
The information in this page is also available in tutorial form in the EAF section of the Mu2e/Tutorial GitHub [https://github.com/Mu2e/Tutorial/tree/main/EAF]. | |||
= Introduction = | = Introduction = | ||
This page is intended as a guide to the Fermilab Elastic Analysis Facility (EAF) for Mu2e collaborators. The official EAF documentation from SCD can be found at https://eafjupyter.readthedocs.io/en/latest/. | This page is intended as a guide to the Fermilab Elastic Analysis Facility (EAF) for Mu2e collaborators. The official EAF documentation from SCD can be found at [https://eafjupyter.readthedocs.io/en/latest/]. | ||
EAF is a web-based platform intended for Python analysis and ML tasks. The key to EAF is the container-based infrastructure, which distinguishes it from traditional virtual machines. The benefit of this approach is that underlying resources (the hardware) can be swapped without breaking the container, adding elasticity. | EAF is a web-based platform intended for Python analysis and ML tasks. The key to EAF is the container-based infrastructure, which distinguishes it from traditional virtual machines. The benefit of this approach is that underlying resources (the hardware) can be swapped without breaking the container, adding elasticity. | ||
| Line 14: | Line 19: | ||
= Accessing EAF = | = Accessing EAF = | ||
EAF is entirely web-based, that is, there is no interactive <code>ssh</code> access at present. This means that in order to access EAF from outside the FNAL network you will either need to use the Fermilab VPN, or set up a proxy. You will also need an active services account. | EAF is entirely web-based at https://analytics-hub.fnal.gov, that is, there is no interactive <code>ssh</code> access at present. This means that in order to access EAF from outside the FNAL network you will either need to use the Fermilab VPN, or set up a proxy. You will also need an active services account. | ||
There are number of ways to set up a proxy. One method, which is endorsed by SCD and should be applicable to all operating systems, is use Firefox with some modified network settings. Instructions on how to do this are given below. | There are number of ways to set up a proxy. One method, which is endorsed by SCD and should be applicable to all operating systems, is use Firefox with some modified network settings. Instructions on how to do this are given below. | ||
| Line 114: | Line 119: | ||
= The Mu2e environment = | = The Mu2e environment = | ||
Custom environments allow for flexibility beyond the base image, which is managed by SCD. To provide users with the tools needed to conduct analysis, we have an installed a Python environment on <code>/ | Custom environments allow for flexibility beyond the base image, which is managed by SCD. To provide users with the tools needed to conduct analysis, we have an installed a Python environment on <code>/cvmfs</code> that can used on by EAF and the virtual machines. | ||
To use this environment, create a symlink in your EAF <code>.conda</code> directory that points to the environment, as shown below. | To use this environment, create a symlink in your EAF <code>~/.conda</code> directory that points to the current environment, as shown below. | ||
<pre> | <pre> | ||
ln -s / | ln -s /cvmfs/mu2e.opensciencegrid.org/env/ana/current ~/.conda/envs/mu2e_env | ||
</pre> | </pre> | ||
| Line 146: | Line 151: | ||
conda-pack | conda-pack | ||
fsspec-xrootd | fsspec-xrootd | ||
htop | |||
vector | |||
plotly | |||
dash | |||
tdqm | |||
hist | |||
tmux | |||
pyutils (Mu2e Python utilities) | |||
</pre> | </pre> | ||
<code>pyutils</code> is a suite of tools intended for Python-based analyses of Mu2e data, particularly <code>EventNtuple</code>. For information on how to use the tools please see the <code>pyutils</code> GitHub [https://github.com/Mu2e/pyutils]. Note that environment versions <2.0.0 contain the deprecated anapytools, rather than pyutils. For more information | |||
As of version 1.2.0, an interactive kernel called <code>mu2e_env</code> is <b>automatically available upon activating the environment</b>. If you are using a version prior to this, and would like to use the environment interactively, you must install an <code>ipython</code> kernel in your user area with following command. | |||
<pre> | <pre> | ||
| Line 157: | Line 171: | ||
After refreshing the page, you should then see <code>mu2e_env</code> appear as an option when launching a notebook or interactive console. | After refreshing the page, you should then see <code>mu2e_env</code> appear as an option when launching a notebook or interactive console. | ||
You can also install the <code>mu2e_env</code> environment in your user area from a <code>YAML</code> file, for example: | |||
<pre> | <pre> | ||
mamba env create -f /exp/mu2e/data/users/sgrant/EAF/env/mu2e_env | mamba env create -f /exp/mu2e/data/users/sgrant/EAF/env/yml/mu2e_env.vX.X.X.yml | ||
mamba activate mu2e_env | mamba activate mu2e_env.vX.X.X | ||
</pre> | </pre> | ||
In any case, you should now see | In any case, you should now see the environment display name as a prefix on your command line. | ||
<pre> | <pre> | ||
( | (current) [<username>@jupyter-<username> ~]$ | ||
</pre> | </pre> | ||
To | To use this environment on the Mu2e virtual machines, please use the <code>pyenv</code> script which is automatically available after <code>mu2einit</code>: | ||
<pre> | |||
mu2einit # or "source /cvmfs/mu2e.opensciencegrid.org/setupmu2e-art.sh" | |||
pyenv ana # Setup the current environment | |||
pyenv rootana # Setup the current environment, plus ROOT for pyROOT users | |||
pyenv ana 2.1.0 # Setup a specific version | |||
pyenv -h # Get help (--help and pyenv with no flag will also return help) | |||
</pre> | |||
Once you have activated your environment, you can run a brief test to check that your packages are working: | |||
<pre> | |||
$ python | |||
>>> import numpy | |||
</pre> | |||
This first time you import a package may take a minute -- subsequent imports should be faster (thanks to file caching). | |||
== Change log == | |||
=== ana === | |||
==== 1.0.0 ==== | |||
This was the first official version of the environment. It contains a set of packages which mirror the contents of its predecessor [https://mu2ewiki.fnal.gov/wiki/Pyana pyana], as well as including <code>anapytools</code>. | |||
'''Packages:''' | |||
<pre> | |||
matplotlib | |||
pandas | |||
uproot | |||
scipy | |||
scikit-learn | |||
pytorch | |||
tensorflow | |||
jupyterlab | |||
notebook | |||
statsmodels | |||
awkward | |||
urllib3==1.26.16 | |||
ipykernel | |||
conda-pack | |||
htop | |||
anapytools==2.0.0 | |||
</pre> | |||
==== 1.1.0 ==== | |||
'''Key changes:''' | |||
* Added the <code>vector</code> package, which is needed by <code>mu2epyutils</code> | |||
* Patch for "Qt platform plugin" and "Fontconfig" errors when running the <code>matplotlib</code> GUI | |||
'''Notes:''' | |||
The patch involved introducing the script <code>1.1.0/etc/conda/activate.d/env_vars.sh</code> which sets the following environment variables upon activation: | |||
<pre> | <pre> | ||
export QT_QPA_PLATFORM_PLUGIN_PATH="$CONDA_PREFIX/lib/qt6/plugins/platforms" # Matplotlib GUI plugin | |||
export FONTCONFIG_FILE="$CONDA_PREFIX/etc/fonts/fonts.conf" # Matplotlib fonts | |||
</pre> | </pre> | ||
and to | ==== 1.1.1 ==== | ||
'''Key changes:''' | |||
Patched conflict with the default Python interpreter when using the environment alongside <code>muse</code>. | |||
'''Notes:''' | |||
The patch explicitly points to the environment's Python in <code>PATH</code> and to the environment's packages in <code>PYTHONPATH</code>. These variables were added to <code>env_vars.sh</code> to be available upon activation: | |||
<pre> | <pre> | ||
export PATH="$CONDA_PREFIX/bin:$PATH" # Interpreter | |||
export PYTHONPATH="$CONDA_PREFIX/lib/python3.12/site-packages:$PYTHONPATH" # Packages | |||
</pre> | </pre> | ||
==== 1.2.0 ==== | |||
'''Key changes:''' | |||
* Added packages: <code>plotly</code> and <code>dash</code> (requested for DQM development) | |||
* Included a built-in kernel called <code>mu2e_env</code> that becomes available automatically after activating the environment | |||
'''Notes:''' | |||
* Works on both EAF and VMs | |||
* Users no longer need to install their own local kernel for interactive use | |||
* Kernel installed at: <code>1.2.0/share/jupyter/kernels/mu2e_env.v1.2.0</code> | |||
* Described by <code>kernel.json</code> which points to the Python currently in-use | |||
When installing a kernel into a prefix without a default <code>python</code> kernel, <code>ipykernel</code> automatically creates one at <code>1.2.0/share/jupyter/kernels/python3</code>. This creates complications, but this default kernel is required by <code>conda-pack</code>. As a workaround, I replaced the auto-created kernel with a symlink: <code>python3/kernel.json -> mu2e_env.v1.2.0/kernel.json</code> | |||
In addition to this, the following environmental was added to <code>env_vars.sh</code>: | |||
<pre> | <pre> | ||
export JUPYTER_PATH="$CONDA_PREFIX/share/jupyter/kernels:$JUPYTER_PATH" # Path to kernel | |||
</pre> | </pre> | ||
[[Category:EAF]] [[ | ==== 1.3.0 ==== | ||
'''Key changes:''' | |||
* Added the <code>tqdm</code> package | |||
* Add the <code>hist</code> package | |||
'''Notes:''' | |||
This packages are required by the latest version of <code>pyutils</code>. | |||
==== 2.0.0 ==== | |||
Replaced <code>anapytools</code> with a standalone version of <code>pyutils</code>. | |||
Please see [https://github.com/Mu2e/pyutils https://github.com/Mu2e/pyutils], which contains extensive documentation. | |||
==== 2.1.0 ==== | |||
Includes <code>pyutils_v1.2.0</code>, with various additions and patches from [https://github.com/Mu2e/pyutils/pull/14 PR-14], [https://github.com/Mu2e/pyutils/pull/15 PR-15], and | |||
, and [https://github.com/Mu2e/pyutils/pull/18 PR-18]. | |||
Also includes <code>tmux</code>, a Jupyter friendly alternative to screen. | |||
Finally, this version of the environment includes an fix to an environment variable contamination issue when using <code>pyenv</code> alongside standard Mu2e scripts. It should now no longer matter when you run <code>pyenv ana</code> in relation to scripts such as <code>muse setup</code>. | |||
=== rootana === | |||
==== 1.2.0 ==== | |||
This is identical to ana [[#1.2.0]], but contains '''<code>ROOT</code> version 6.32.02'''. | |||
==== 2.0.0 ==== | |||
This is an '''unofficial version''', hosted here <code>/exp/mu2e/data/users/sgrant/EAF/env/rootana_v2.0.0</code> | |||
==== 2.1.0 ==== | |||
This is identical to ana [[#2.1.0]], but contains '''<code>ROOT</code> version 6.34.04'''. | |||
'''Key changes:''' | |||
* <code>Python</code>: 3.12 -> 3.11 | |||
* <code>ROOT</code>: 6.32.02 -> 6.32.00 | |||
* <code>tensorflow:</code> 2.16 -> 2.17 | |||
* <code>onnx</code> and <code>tf2onnx</code> | |||
'''Notes:''' | |||
ROOT is incompatible with TensorFlow 2.16 due to [https://github.com/root-project/root/issues/15309 this known issue]. To resolve this: | |||
* TensorFlow was downgraded to version 2.15 | |||
* Python was downgraded to 3.11 to maintain compatibility | |||
Some standard packages were downgraded to ensure compatibility with Python 3.11. | |||
[[Category:EAF]] | |||
[[Category:Custom environments]] | |||
= Custom environments = | = Custom environments = | ||
| Line 201: | Line 352: | ||
</pre> | </pre> | ||
You can then install whatever packages you need using <code>mamba install <package_name></code>. | |||
[[Category:Mu2e EAF tools]] [[ category:Mu2e EAF tools]] | [[Category:Mu2e EAF tools]] [[ category:Mu2e EAF tools]] | ||
= | = anapytools = | ||
Along with some standard Python libraries, <code>mu2e_env</code> | '''Note''': <code>anapytools</code> has been superseded by <code>pyutils</code> and should be phased out. | ||
Along with some standard Python libraries, <code>mu2e_env</code> comes with a some additional utilities from https://github.com/Mu2e/anapytools.git. | |||
At present, <code> | At present, <code>anapytools</code> allows users to interface with <code>SAM</code> and <code>/pnfs</code> from EAF, and provides a multithreading tool. These can be imported as packages from <code>anapytools</code> called <code>read_data</code> and <code>parallelise</code>. | ||
Before reading files, you will need a valid access token/certificate. Run the following: | Before reading files, you will need a valid access token/certificate. Run the following: | ||
| Line 221: | Line 374: | ||
<pre> | <pre> | ||
from | $ python | ||
file_list = | >>> from anapytools.read_data import DataReader | ||
>>> reader = DataReader() | |||
>>> file_list = reader.get_file_list(defname='nts.mu2e.CeEndpointMix1BBSignal.Tutorial_2024_03.tka') | |||
</pre> | </pre> | ||
| Line 228: | Line 383: | ||
<pre> | <pre> | ||
from | $ python | ||
file = | >>> from anapytools.read_data import DataReader | ||
>>> reader = DataReader() | |||
>>> file = reader.read_file(filename='nts.sgrant.CosmicCRYExtractedCatTriggered.MDC2020ae_best_v1_3.001205_00000000.root') | |||
</pre> | </pre> | ||
An example of <code>read_data</code> in use is shown below. The <code>read_data</code> functions also include a <code>quiet</code> flag to suppress their printouts, if needed. | An example of <code>read_data</code> in use is shown below. The <code>read_data</code> functions also include a <code>quiet</code> flag to suppress their printouts, if needed. | ||
[[File:read_data.png|768px|center|read_data()]] | [[File:read_data.png|768px|center|read_data.png()]] | ||
To run parallel reads on a list of files using multithreading, run: | To run parallel reads on a list of files using multithreading, run: | ||
<pre> | <pre> | ||
from | $ python | ||
def process_function(filename): | >>> from anapytools.read_data import DataReader | ||
>>> from anapytools.parallelise import ParallelProcessor | |||
>>> reader = DataReader() | |||
>>> processor = ParallelProcessor() | |||
>>> file_list = reader.get_file_list(defname='nts.sgrant.CosmicCRYExtractedCatTriggered.MDC2020ae_best_v1_3.root', quiet=False) | |||
>>> def process_function(filename): | |||
file = reader.read_file(filename, quiet=True) | |||
return | |||
>>> processor.multithread(process_function, file_list) | |||
</pre> | </pre> | ||
| Line 250: | Line 412: | ||
[[File:parallelise.png|768px|center|parallelise.png()]] | [[File:parallelise.png|768px|center|parallelise.png()]] | ||
More tools will be added | More tools will be added in future. | ||
Latest revision as of 19:50, 15 July 2025
Note
The information in this page is also available in tutorial form in the EAF section of the Mu2e/Tutorial GitHub [1].
Introduction
This page is intended as a guide to the Fermilab Elastic Analysis Facility (EAF) for Mu2e collaborators. The official EAF documentation from SCD can be found at [2].
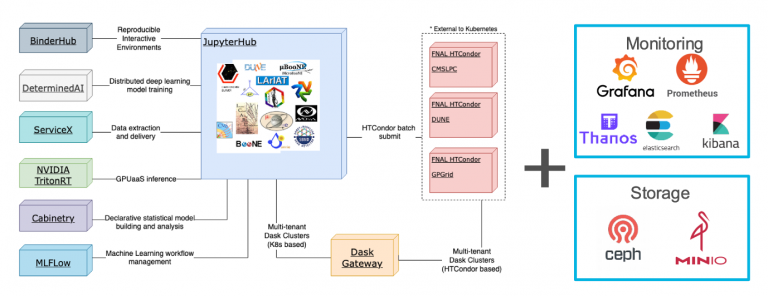
EAF is a web-based platform intended for Python analysis and ML tasks. The key to EAF is the container-based infrastructure, which distinguishes it from traditional virtual machines. The benefit of this approach is that underlying resources (the hardware) can be swapped without breaking the container, adding elasticity.
EAF is a a powerful and flexible platform, ideal for running Mu2e Python analyses and ML tasks.
Accessing EAF
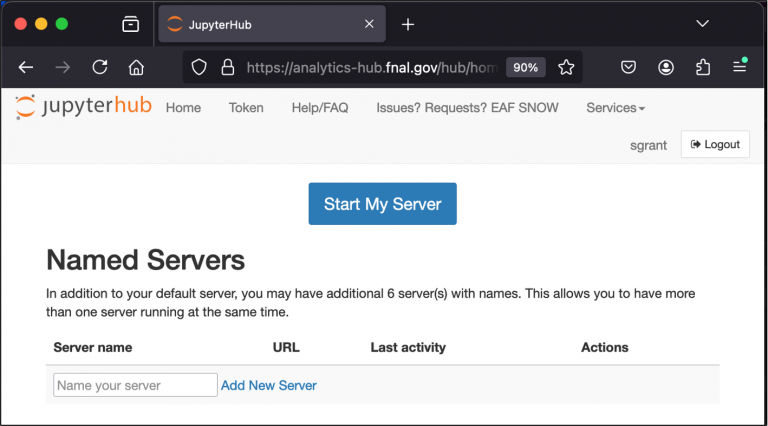
EAF is entirely web-based at https://analytics-hub.fnal.gov, that is, there is no interactive ssh access at present. This means that in order to access EAF from outside the FNAL network you will either need to use the Fermilab VPN, or set up a proxy. You will also need an active services account.
There are number of ways to set up a proxy. One method, which is endorsed by SCD and should be applicable to all operating systems, is use Firefox with some modified network settings. Instructions on how to do this are given below.
- Ensure you have a valid kerberos ticket: check with
klist, runkinit <username>@FNAL.GOVto make a new one. Make sure to replace<username>with your FNAL username. - Open a terminal and start an
sshtunnel to an FNAL machine on which you have an account (such asmu2egpvm01).ssh -f -N -D 9999 <username>@mu2egpvm01.fnal.gov
- Open Firefox and type
about:configinto the address bar, click OK to ignore the warning. - Use the search bar to change the parameters by to the values shown in the table below.
| Parameter | Value |
|---|---|
| network.proxy.socks | 127.0.0.1 |
| network.proxy.socks_port | 9999 |
| network.proxy.socks_remote_dns | true |
| network.proxy.type | 1 |
To stop the proxy, change network.proxy.type back to its default value by pressing the reset button to the right of the edit button.
See https://library.fnal.gov/off-site-electronic-access-instructions for more information.
Starting an EAF server
Once you have started your proxy server and ssh tunnel (if you are off-site), go the EAF home page at
https://analytics-hub.fnal.gov
on which you should see a welcome page which will invite you to sign in with your Fermilab Services (SSO) account.
Make sure you're using the same browser as the one you have configured to use a proxy! You should see a page with a Start My Server button. If you click on this button it will take you to a Server Options page.
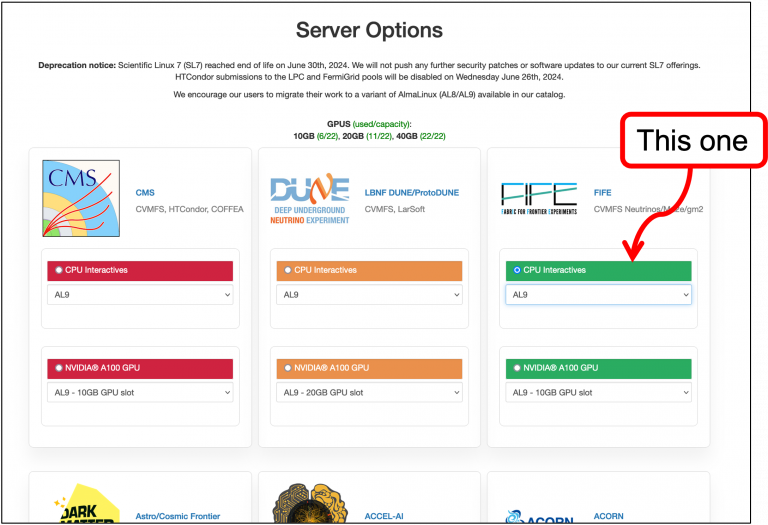
Follow the instructions below to start an AL9 server.
- Go to the
FIFEserver box:
- Click
CPU Interactives. - Select
AL9. - Scroll down to bottom of the page and click
Start.
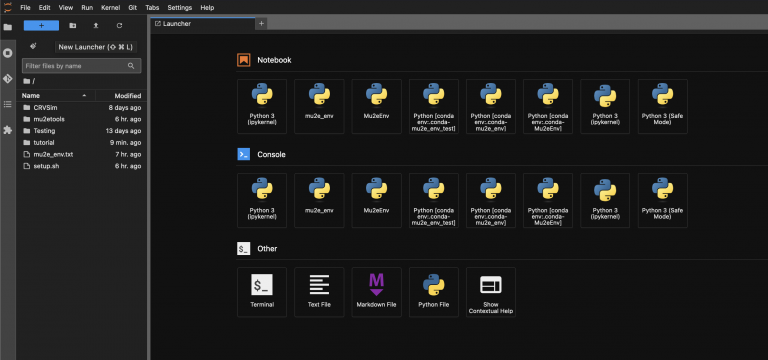
The server may take a few minutes to start up. You will see a page like this
There is also an option to start a server from a Mu2e AL9 image, which is now deprecated. Instead, it is recommended to use the mu2e_env environment described in The Mu2e environment.
JupterHub and the EAF area
On loading an EAF server you be land on a JupyterHub launcher page. From here you should see various options to applications such as a terminal, a python notebook, a python file editor, or an interactive python console. It also provides options run the interactive applications with different Python kernels, where kernels represent both the execution engine and the packages, libraries, and dependencies available to the Python interpreter. You can also access these options by clicking the blue "+" button on the top right.
If you open a terminal and run pwd, you will see that a user area has been automatically created for you in /home. From here, you have direct access to the /exp/mu2e/app and /exp/mu2e/data areas. Access to /pnfs requires xroot, which is included in the mu2e_env environment described in The Mu2e environment.
Each user has eight guaranteed cores, a 64 GB memory limit, and 23 GB of storage on their EAF user area.
Conda/Mamba
Conda and Mamba are open-source packages and environment management systems. Mamba is a C++ reimplementation of Conda: it has the same command syntax but is supposed to be more efficient. Mamba is the tool used in this example to set up our Mu2e environment, and can be used to create and manage custom user environments.
Upon initialising, Mamba will write some lines to your $HOME/.bashrc files, so first make sure that your $HOME/.bash_profile is set up to read from the .bashrc by adding the following lines to your .bash_profile using any command line text editor (such as emacs or vim).
# Get aliases and functions
if [ -f ~/.bashrc ]; then
    . ~/.bashrc
fi
To start using Mamba, again using a terminal from the JupyterHub launcher, and initialise Mamba as shown below.
mamba init
This will prompt you to open a new shell, so close the current session and start a new one.
You only need to do this once.
The Mu2e environment
Custom environments allow for flexibility beyond the base image, which is managed by SCD. To provide users with the tools needed to conduct analysis, we have an installed a Python environment on /cvmfs that can used on by EAF and the virtual machines.
To use this environment, create a symlink in your EAF ~/.conda directory that points to the current environment, as shown below.
ln -s /cvmfs/mu2e.opensciencegrid.org/env/ana/current ~/.conda/envs/mu2e_env
You can then activate the environment using mamba.
mamba activate mu2e_env
Once inside the environment, you have access to the libraries listed below.
matplotlib
pandas
uproot
scipy
scikit-learn
pytorch
tensorflow
jupyterlab
notebook
statsmodels
awkward
urllib3==1.26.16
ipykernel
conda-pack
fsspec-xrootd
htop
vector
plotly
dash
tdqm
hist
tmux
pyutils (Mu2e Python utilities)
pyutils is a suite of tools intended for Python-based analyses of Mu2e data, particularly EventNtuple. For information on how to use the tools please see the pyutils GitHub [3]. Note that environment versions <2.0.0 contain the deprecated anapytools, rather than pyutils. For more information
As of version 1.2.0, an interactive kernel called mu2e_env is automatically available upon activating the environment. If you are using a version prior to this, and would like to use the environment interactively, you must install an ipython kernel in your user area with following command.
python -m ipykernel install --user --name mu2e_env --display-name "mu2e_env"
After refreshing the page, you should then see mu2e_env appear as an option when launching a notebook or interactive console.
You can also install the mu2e_env environment in your user area from a YAML file, for example:
mamba env create -f /exp/mu2e/data/users/sgrant/EAF/env/yml/mu2e_env.vX.X.X.yml
mamba activate mu2e_env.vX.X.X
In any case, you should now see the environment display name as a prefix on your command line.
(current) [<username>@jupyter-<username> ~]$
To use this environment on the Mu2e virtual machines, please use the pyenv script which is automatically available after mu2einit:
mu2einit # or "source /cvmfs/mu2e.opensciencegrid.org/setupmu2e-art.sh"
pyenv ana # Setup the current environment
pyenv rootana # Setup the current environment, plus ROOT for pyROOT users
pyenv ana 2.1.0 # Setup a specific version
pyenv -h # Get help (--help and pyenv with no flag will also return help)
Once you have activated your environment, you can run a brief test to check that your packages are working:
$ python
>>> import numpy
This first time you import a package may take a minute -- subsequent imports should be faster (thanks to file caching).
Change log
ana
1.0.0
This was the first official version of the environment. It contains a set of packages which mirror the contents of its predecessor pyana, as well as including anapytools.
Packages:
matplotlib
pandas
uproot
scipy
scikit-learn
pytorch
tensorflow
jupyterlab
notebook
statsmodels
awkward
urllib3==1.26.16
ipykernel
conda-pack
htop
anapytools==2.0.0
1.1.0
Key changes:
- Added the
vectorpackage, which is needed bymu2epyutils - Patch for "Qt platform plugin" and "Fontconfig" errors when running the
matplotlibGUI
Notes:
The patch involved introducing the script 1.1.0/etc/conda/activate.d/env_vars.sh which sets the following environment variables upon activation:
export QT_QPA_PLATFORM_PLUGIN_PATH="$CONDA_PREFIX/lib/qt6/plugins/platforms" # Matplotlib GUI plugin
export FONTCONFIG_FILE="$CONDA_PREFIX/etc/fonts/fonts.conf" # Matplotlib fonts
1.1.1
Key changes:
Patched conflict with the default Python interpreter when using the environment alongside muse.
Notes:
The patch explicitly points to the environment's Python in PATH and to the environment's packages in PYTHONPATH. These variables were added to env_vars.sh to be available upon activation:
export PATH="$CONDA_PREFIX/bin:$PATH" # Interpreter
export PYTHONPATH="$CONDA_PREFIX/lib/python3.12/site-packages:$PYTHONPATH" # Packages
1.2.0
Key changes:
- Added packages:
plotlyanddash(requested for DQM development) - Included a built-in kernel called
mu2e_envthat becomes available automatically after activating the environment
Notes:
- Works on both EAF and VMs
- Users no longer need to install their own local kernel for interactive use
- Kernel installed at:
1.2.0/share/jupyter/kernels/mu2e_env.v1.2.0 - Described by
kernel.jsonwhich points to the Python currently in-use
When installing a kernel into a prefix without a default python kernel, ipykernel automatically creates one at 1.2.0/share/jupyter/kernels/python3. This creates complications, but this default kernel is required by conda-pack. As a workaround, I replaced the auto-created kernel with a symlink: python3/kernel.json -> mu2e_env.v1.2.0/kernel.json
In addition to this, the following environmental was added to env_vars.sh:
export JUPYTER_PATH="$CONDA_PREFIX/share/jupyter/kernels:$JUPYTER_PATH" # Path to kernel
1.3.0
Key changes:
- Added the
tqdmpackage - Add the
histpackage
Notes:
This packages are required by the latest version of pyutils.
2.0.0
Replaced anapytools with a standalone version of pyutils.
Please see https://github.com/Mu2e/pyutils, which contains extensive documentation.
2.1.0
Includes pyutils_v1.2.0, with various additions and patches from PR-14, PR-15, and
, and PR-18.
Also includes tmux, a Jupyter friendly alternative to screen.
Finally, this version of the environment includes an fix to an environment variable contamination issue when using pyenv alongside standard Mu2e scripts. It should now no longer matter when you run pyenv ana in relation to scripts such as muse setup.
rootana
1.2.0
This is identical to ana #1.2.0, but contains ROOT version 6.32.02.
2.0.0
This is an unofficial version, hosted here /exp/mu2e/data/users/sgrant/EAF/env/rootana_v2.0.0
2.1.0
This is identical to ana #2.1.0, but contains ROOT version 6.34.04.
Key changes:
Python: 3.12 -> 3.11ROOT: 6.32.02 -> 6.32.00tensorflow:2.16 -> 2.17onnxandtf2onnx
Notes:
ROOT is incompatible with TensorFlow 2.16 due to this known issue. To resolve this:
- TensorFlow was downgraded to version 2.15
- Python was downgraded to 3.11 to maintain compatibility
Some standard packages were downgraded to ensure compatibility with Python 3.11.
Custom environments
To start entirely from scratch, you can create a clean custom environment with the commands below.
mamba create -q -y -n my_env
mamba activate my_env
You can then install whatever packages you need using mamba install <package_name>.
anapytools
Note: anapytools has been superseded by pyutils and should be phased out.
Along with some standard Python libraries, mu2e_env comes with a some additional utilities from https://github.com/Mu2e/anapytools.git.
At present, anapytools allows users to interface with SAM and /pnfs from EAF, and provides a multithreading tool. These can be imported as packages from anapytools called read_data and parallelise.
Before reading files, you will need a valid access token/certificate. Run the following:
source /cvmfs/mu2e.opensciencegrid.org/setupmu2e-art.sh
kinit ${USER}@FNAL.GOV
/cvmfs/mu2e.opensciencegrid.org/bin/vomsCert
To create a file list from a SAM dataset:
$ python
>>> from anapytools.read_data import DataReader
>>> reader = DataReader()
>>> file_list = reader.get_file_list(defname='nts.mu2e.CeEndpointMix1BBSignal.Tutorial_2024_03.tka')
To read a file from /pnfs using xroot:
$ python
>>> from anapytools.read_data import DataReader
>>> reader = DataReader()
>>> file = reader.read_file(filename='nts.sgrant.CosmicCRYExtractedCatTriggered.MDC2020ae_best_v1_3.001205_00000000.root')
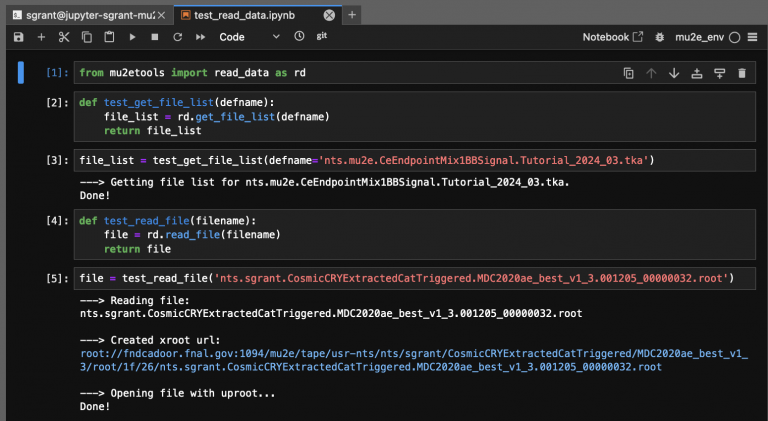
An example of read_data in use is shown below. The read_data functions also include a quiet flag to suppress their printouts, if needed.
To run parallel reads on a list of files using multithreading, run:
$ python
>>> from anapytools.read_data import DataReader
>>> from anapytools.parallelise import ParallelProcessor
>>> reader = DataReader()
>>> processor = ParallelProcessor()
>>> file_list = reader.get_file_list(defname='nts.sgrant.CosmicCRYExtractedCatTriggered.MDC2020ae_best_v1_3.root', quiet=False)
>>> def process_function(filename):
        file = reader.read_file(filename, quiet=True)
        return
>>> processor.multithread(process_function, file_list)
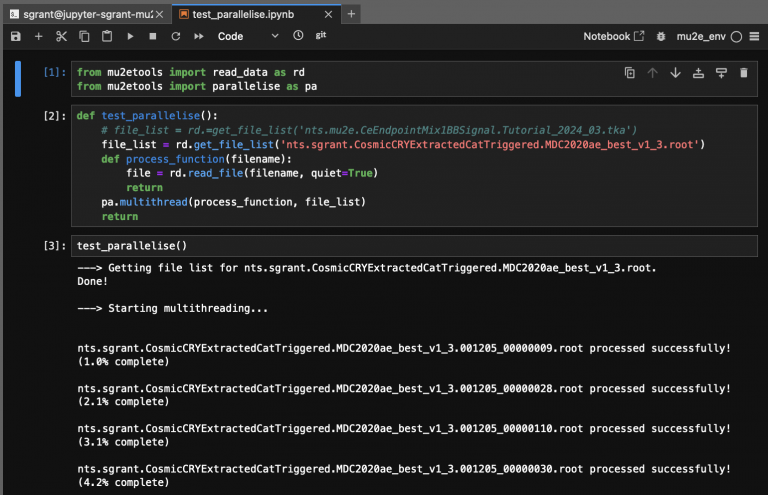
An example of parallelise in use is shown below.
More tools will be added in future.
